Easy way to create REST API for CRUD operations using Spring Boot
REST APIs are one of the important part of web application. Its used to communicate between client application and the server.
In this post I’ll share a demo app with which you can create a category, add items to category, display items, modify items and delete items.
The app will be build using Java 8 and Spring Boot.
Prerequisite: Java 8 JDK or above should be installed, MVN should be installed, IDE like Intellij, Eclipse or STS installed.
Table of Content
- 1. What is CRUD?
- 2. Create REST API using Spring Boot
- 3. Performing CRUD Operations.
- 4. Brief about HAL and HATEOAS.
- 5. Conclusion
1. What is CRUD?
CRUD is an acronym for Create, Read, Update and Delete. These are the operations which you’ll perform to persist or manipulate the data in a database.
🖊️ 📰 🔄 🗑️
Create Read Update Delete
2. Create REST API using Spring Boot
With Spring Data REST you can instantly create CRUD api with just the entity classes and repositories.
2.1. Initializing Spring Boot Project
For this we’ll visit https://start.spring.io and add details accordingly. then we’ll select the required dependencies for our project.

As dependencies I have selected
- Spring Web
- Rest Repository
- Spring Data JPA
- H2 Database
and as Dev Dependencies I have selected
- Lombok
- Spring boot DevTool
Click on generate button, download the file, extract it and open it in your IDE (I’m using Intellij). Give it some time to load all the dependencies.
2.2. Creating the Entity classes for Category and Item
We’ll use @Data to let Lombok generate all getters and setters for us.
- Create Entity classes Category and Item with property id as UUID and name as String.
- Make the id as
@GeneratedValueand anotate it as@Id. - Make the name field as unique using
@Colum(unique = true). - Create a
@OneToMany()relationship to item in Category class. - Create a
@ManyToOne()relationship to category in Item class. - Add property price of type Integer to Item class.
Category Class
@Data
@Entity
public class Category {
    @Id
    @GeneratedValue()
    private UUID id;

    @Column(unique = true)
    private String name;

    @OneToMany()
    private Set<Item> items;
}
Item Class
@Data
@Entity
public class Item {
    @Id
    @GeneratedValue()
    private UUID id;

    @Column(unique = true)
    private String name;
    private Integer price;

    @ManyToOne()
    private Category category;
}
2.3. Create repository interface for Category and Item
We’ll use CrudRepository for Category and JpaRepository(to get pagination) for Items.
Category Repository
public interface CategoryRepository extends CrudRepository<Category, UUID> {
}
Item Repository
public interface ItemRepository extends JpaRepository<Item, UUID> {
}
🚀 And under 40 line of code our backend API is ready for performing some CRUD operations.
Link to repository is provided in the conclusion.
3. Performing CRUD Operations.
Note: We are using H2 in-memory database; to persist the data configure the database in application.properties file.
Start the application by right clicking on Application class (In my case its RestApiCrudDemoApplication.java) and click run.
3.1. Create a new category.
- Open postman and enter http://localhost:8080/categories
- Change method from GET to POST.
- Select **Body** tab, then select **raw** radio button and select type as **JSON**.
- In the body text area, add a json object with name attribute.


3.2. Read categories.
- Duplicate the current tab in postman.
- Change the method to GET and click send.
- It will respond with the below JSON data.

{
    "_embedded": {
        "categories": [
            {
                "name": "Electric Car",
                "_links": {
                    "self": {
                        "href": "http://localhost:8080/categories/e028f2ce-cfd0-4a10-bd71-e732af6d423d"
                    },
                    "category": {
                        "href": "http://localhost:8080/categories/e028f2ce-cfd0-4a10-bd71-e732af6d423d"
                    },
                    "items": {
                        "href": "http://localhost:8080/categories/e028f2ce-cfd0-4a10-bd71-e732af6d423d/items"
                    }
                }
            },
            {
                "name": "Electric Bikes",
                "_links": {
                    "self": {
                        "href": "http://localhost:8080/categories/022315ef-94a1-4cd0-987c-b30c5626a37b"
                    },
                    "category": {
                        "href": "http://localhost:8080/categories/022315ef-94a1-4cd0-987c-b30c5626a37b"
                    },
                    "items": {
                        "href": "http://localhost:8080/categories/022315ef-94a1-4cd0-987c-b30c5626a37b/items"
                    }
                }
            }
        ]
    },
    "_links": {
        "self": {
            "href": "http://localhost:8080/categories"
        },
        "profile": {
            "href": "http://localhost:8080/profile/categories"
        }
    }
}
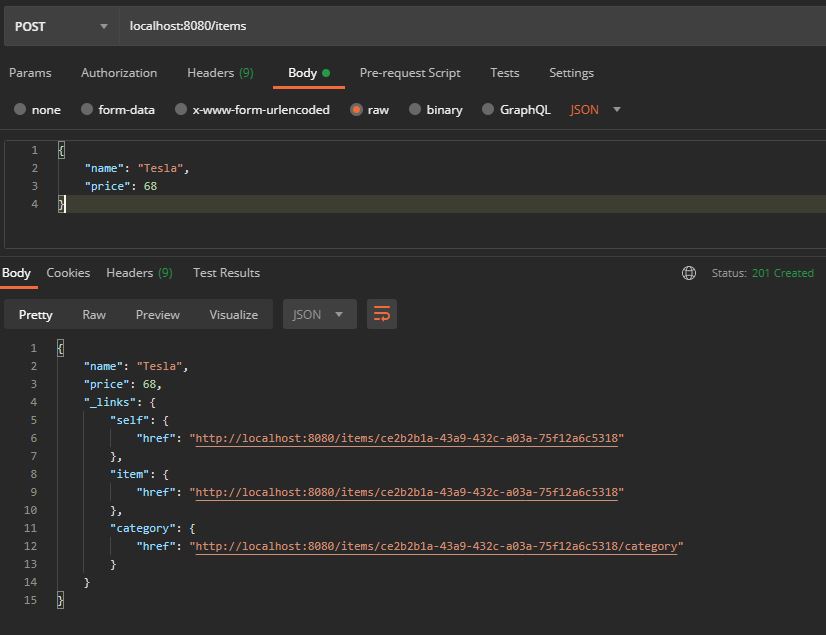
3.3. Create a new item
- Open postman and enter http://localhost:8080/items
- Change method from GET to POST.
- Select Body tab, then select raw radio button and select type as JSON.
- In the body text area, add a json object with name and price attribute.
- Create 2 or more items.
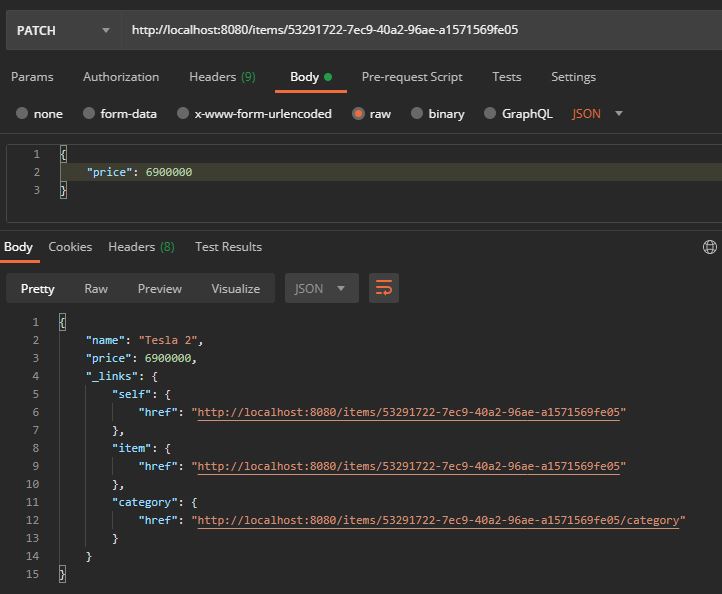
3.4. Update the item price
- Do a get call on http://localhost:8080/items
- click on self link on the item which you have to update.
- Since its just one attribute I’ll use PATCH method to update.
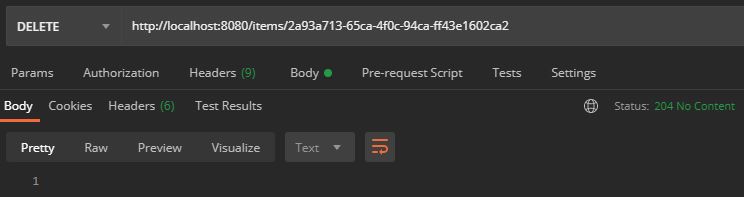
3.5. Delete Item by ID
- Similar to previous step click on the self url of the item to delete.
- change the method type to DELETE and click send.
3.6. Link or associate the items to a category.
- Click on the link in categories > _links > items > href
- Postman will open a new tab, change the method type to PUT
- Select the headers tab and add new key as
Content-Typeand value astext/uri-list - Now hit the http://localhost:8080/items endpoint using get method
- Copy the self link from items > _links > self > href
This will add multiple items to the category in one put request. If you want to add a single Item to a category, you can also do it by PUT
category > _links > self > hreftoitems > _links > category > href
You can view the association by doing a get call on http://localhost:8080/categories/< Replace this with Category Id >/items
4. Brief about HAL and HATEOAS.
With HATEOAS (Hypermedia as the Engine of Application State), a client interacts with a network application whose application servers provide information dynamically through hypermedia. A REST client needs little to no prior knowledge about how to interact with an application or server beyond a generic understanding of hypermedia.
HAL (Hypertext Application Language) is one of such standards. It is a specific format of resource presentation, that can be used to implement HATEOAS.
5. Conclusion
In this tutorial, we have demonstrated how to quickly create REST APIs for performing CURD operations with the help of Spring Data REST.